Spring Boot
Spring框架主要功能包括IoC容器、AOP支持、事务支持、MVC开发以及强大的第三方集成功能等。
Spring Boot是一个基于Spring的套件,它帮我们预组装了Spring的一系列组件,以便以尽可能少的代码和配置来开发基于Spring的Java应用程序。
Spring Boot的目标就是提供一个开箱即用的应用程序架构,我们基于Spring Boot的预置结构继续开发,省时省力。
Spring Boot应用
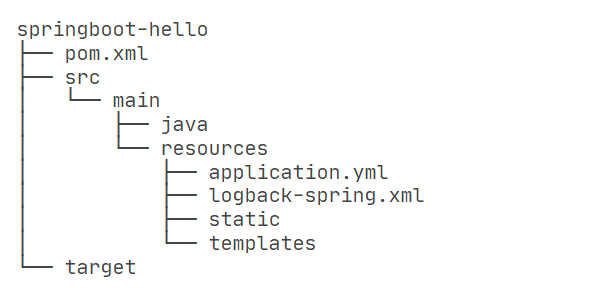
创建标准的Maven目录结构如下:

项目构成
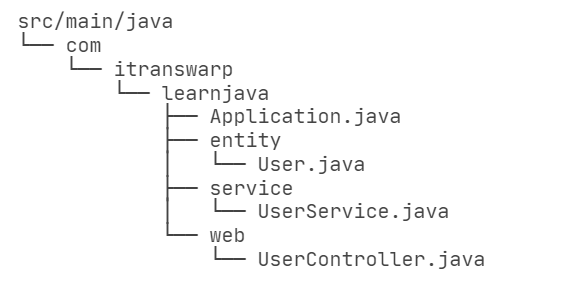
Application:静态资源映射,拦截器
DatabaseInitializer:数据库初始化
web:Controller
service:服务层
entity:实体类
application.yml
Spring Boot默认的一种层级格式的YAML配置文件
环境变量
在配置文件中,我们经常使用如下的格式对某个key进行配置:
app:
  db:
    host: ${DB_HOST:localhost}
    user: ${DB_USER:root}
    password: ${DB_PASSWORD:password}
${DB_HOST:localhost} 意思是,首先从环境变量查找 DB_HOST,如果环境变量定义了,那么使用环境变量的值,否则,使用默认值 localhost
开发时无需设定任何环境变量,直接使用默认值即本地数据库,而实际线上运行的时候,只需要传入环境变量即可:
$ DB_HOST=10.0.1.123 DB_USER=prod DB_PASSWORD=xxxx java -jar xxx.jar
logback-spring.xml
Spring Boot的logback配置文件名称(也可以使用 logback.xml )
通过 <include resource="..." /> 引入了Spring Boot的一个缺省配置,这样我们就可以引用类似 ${CONSOLE_LOG_PATTERN} 这样的变量。上述配置定义了一个控制台输出和文件输出,可根据需要修改;
java

Spring Boot对Java包的层级结构有一个要求。注意到我们的根package是com.itranswarp.learnjava,下面还有entity、service、web等子package。Spring Boot要求main()方法所在的启动类必须放到根package下,命名不做要求,这里我们以Application.java命名,它的内容如下:
@SpringBootApplication
public class Application {
    public static void main(String[] args) throws Exception {
        SpringApplication.run(Application.class, args);
    }
}
pom.xml
版本对应
| Spring Boot版本 | Spring Boot 2.x | Spring Boot 3.x |
|---|---|---|
| Spring版本 | Spring 5.x | Spring 6.x |
| JDK版本 | >= 1.8 | >= 17 |
| Tomcat版本 | 9.x | 10.x |
<?xml version="1.0" encoding="UTF-8"?>
<project xmlns="http://maven.apache.org/POM/4.0.0"
         xmlns:xsi="http://www.w3.org/2001/XMLSchema-instance"
         xsi:schemaLocation="http://maven.apache.org/POM/4.0.0 http://maven.apache.org/xsd/maven-4.0.0.xsd">

    <parent>
        <groupId>org.springframework.boot</groupId>
        <artifactId>spring-boot-starter-parent</artifactId>
        <version>3.0.0</version>
    </parent>

    <modelVersion>4.0.0</modelVersion>
    <groupId>com.itranswarp.learnjava</groupId>
    <artifactId>springboot-hello</artifactId>
    <version>1.0-SNAPSHOT</version>

    <properties>
        <maven.compiler.source>22</maven.compiler.source>
        <maven.compiler.target>22</maven.compiler.target>
        <project.build.sourceEncoding>UTF-8</project.build.sourceEncoding>
    </properties>

    <dependencies>
        <dependency>
            <groupId>org.springframework.boot</groupId>
            <artifactId>spring-boot-starter-web</artifactId>
        </dependency>

        <dependency>
            <groupId>org.springframework.boot</groupId>
            <artifactId>spring-boot-starter-jdbc</artifactId>
        </dependency>

        <!-- 集成Pebble View -->
        <dependency>
            <groupId>io.pebbletemplates</groupId>
            <artifactId>pebble-spring-boot-starter</artifactId>
            <version>3.2.2</version>
        </dependency>

        <!-- JDBC驱动 -->
        <dependency>
            <groupId>org.hsqldb</groupId>
            <artifactId>hsqldb</artifactId>
        </dependency>
    </dependencies>

</project>
从spring-boot-starter-parent继承,因为这样就可以引入Spring Boot的预置配置;
引入了依赖spring-boot-starter-web和spring-boot-starter-jdbc,它们分别引入了Spring MVC相关依赖和Spring JDBC相关依赖,无需指定版本号,因为引入的<parent>内已经指定了,只有我们自己引入的某些第三方jar包需要指定版本号。
引入pebble-spring-boot-starter作为View,以及hsqldb作为嵌入式数据库。hsqldb已在spring-boot-starter-jdbc中预置了版本号3.0.0,因此此处无需指定版本号。
根据pebble-spring-boot-starter的文档,加入如下配置到application.yml:
pebble:
  # 默认为".peb",改为"":
  suffix:
  # 开发阶段禁用模板缓存:
  cache: false
WebMvcConfigurer
通过 WebMvcConfigurer Bean映射 static路径的资源
@SpringBootApplication
public class Application {
    ...

    @Bean
    WebMvcConfigurer createWebMvcConfigurer(@Autowired HandlerInterceptor[] interceptors) {
        return new WebMvcConfigurer() {
            @Override
            public void addResourceHandlers(ResourceHandlerRegistry registry) {
                // 映射路径`/static/`到classpath路径:
                registry.addResourceHandler("/static/**")
                        .addResourceLocations("classpath:/static/");
            }
        };
    }
}
前面我们定义的数据源、声明式事务、JdbcTemplate在哪创建的?怎么就可以直接注入到自己编写的 UserService 中呢?
这些自动创建的Bean就是Spring Boot的特色:AutoConfiguration。
当我们引入 spring-boot-starter-jdbc 时,启动时会自动扫描所有的 XxxAutoConfiguration:
DataSourceAutoConfiguration:自动创建一个DataSource,其中配置项从application.yml的spring.datasource读取;DataSourceTransactionManagerAutoConfiguration:自动创建了一个基于JDBC的事务管理器;JdbcTemplateAutoConfiguration:自动创建了一个JdbcTemplate。
因此,我们自动得到了一个 DataSource、一个 DataSourceTransactionManager 和一个JdbcTemplate。
类似的,当我们引入 spring-boot-starter-web时,自动创建了:
ServletWebServerFactoryAutoConfiguration:自动创建一个嵌入式Web服务器,默认是Tomcat;DispatcherServletAutoConfiguration:自动创建一个DispatcherServlet;HttpEncodingAutoConfiguration:自动创建一个CharacterEncodingFilter;WebMvcAutoConfiguration:自动创建若干与MVC相关的Bean。- …
引入第三方 pebble-spring-boot-starter 时,自动创建了:
PebbleAutoConfiguration:自动创建了一个PebbleViewResolver。
可见,Spring Boot自动装配功能是通过自动扫描+条件装配实现的,这一套机制在默认情况下工作得很好,但是,如果我们要手动控制某个Bean的创建,就需要详细地了解Spring Boot自动创建的原理,很多时候还要跟踪 XxxAutoConfiguration,以便设定条件使得某个Bean不会被自动创建。
编写controller
SpringMvc 开发:
@Controller
public class UserController {
    @GetMapping("/")
    public ModelAndView index(){
        return new ModelAndView("index.html");
    }
}
IDEA JDK相关设置: “项目结构”里:项目-jdk指定版本号,模块-语言级别指定版本号 ”运行“ “修改运行设置“里:java 版本设置
“设置” “java编译器” “项目字节码版本“,“目标字节码版本” 都设置JDK17支持
开发者工具
Spring Boot提供了一个开发者工具,监控classpath路径上的文件。源码或配置文件发生修改,Spring Boot应用可以自动重启:
<dependency>
    <groupId>org.springframework.boot</groupId>
    <artifactId>spring-boot-devtools</artifactId>
</dependency>
确保IDEA的”文件“—“设置”中:
-
“编译器”—“自动编译项目”勾选
-
“高级设置”—“编译器”—“即使开发的应用程序当前正在运行,也允许自动make启用”勾选
打包应用
Spring Boot自带一个 spring-boot-maven-plugin 插件用来打包,我们只需要在pom.xml中加入以下配置:
<project ...>
    ...
    <build>
        <finalName>awesome-app</finalName> 此项可选,用于指定文件名覆盖默认名称
        <plugins>
            <plugin>
                <groupId>org.springframework.boot</groupId>
                <artifactId>spring-boot-maven-plugin</artifactId>
            </plugin>
        </plugins>
    </build>
</project>
无需任何配置,自动定位应用程序的入口Class,执行Maven命令即可打包:
mvn clean package
直接运行:
$ java -jar springboot-exec-jar-1.0-SNAPSHOT.jar
瘦身应用
spring-boot-maven-plugin 打包应用,最大的缺点就是包体积过大;
如何只打包我们自己编写的代码,同时又自动把依赖包下载到某处,并自动引入到classpath中。解决方案就是使用 spring-boot-thin-launcher:
修改 pom.xml 中 <build>-<plugins>-<plugin>,给原来的 spring-boot-maven-plugin 增加一个 <dependency> 如下:
<plugin>
    <groupId>org.springframework.boot</groupId>
    <artifactId>spring-boot-maven-plugin</artifactId>
    <dependencies>
        <dependency>
            <groupId>org.springframework.boot.experimental</groupId>
            <artifactId>spring-boot-thin-layout</artifactId>
            <version>1.0.27.RELEASE</version>
        </dependency>
    </dependencies>
</plugin>
运行 mvn clean package,最终生成的可执行 jar,只有79KB左右
spring-boot-thin-launcher 插件改变了 spring-boot-maven-plugin 默认行为。它输出的jar包只包含我们自己代码编译后的class,一个很小的 ThinJarWrapper,以及解析pom.xml 后得到的所有依赖jar的列表。
运行的时候,入口实际上是 ThinJarWrapper,它会先在指定目录搜索看看依赖的jar包是否都存在,如果不存在,先从Maven中央仓库下载到本地,然后,再执行我们自己编写的main() 入口方法。
spring-boot-thin-launcher在启动时搜索的默认目录是用户主目录的.m2,我们也可以指定运行jar时下载目录,例如,将下载目录指定为当前目录:
$ java -Dthin.root=. -jar awesome-app.jar
上述命令通过环境变量 thin.root 传入当前目录,执行后发现当前目录下自动生成了一个repository目录,这和Maven的默认下载目录 ~/.m2/repository 的结构是完全一样的,只是它仅包含 awesome-app.jar 所需的运行期依赖项。
预热
第一次在服务器上运行awesome-app.jar时,仍需要从Maven中央仓库下载大量的jar包;
下载所有依赖项,但并运行实际运行 main() 方法,即 “预热”(warm up):
java -Dthin.dryrun=true -Dthin.root=. -jar awesome-app.jar
如果服务器由于安全限制不允许从外网下载文件,那么可以本地预热,然后把 awesome-app.jar 和 repository 目录上传到服务器;
Profiles
Spring Boot对Profiles的支持可以在application.yml中为每个环境进行配置。下面是一个示例配置:
spring:
  application:
    name: ${APP_NAME:unnamed}
  datasource:
    url: jdbc:hsqldb:file:testdb
    username: sa
    password:
    dirver-class-name: org.hsqldb.jdbc.JDBCDriver
    hikari:
      auto-commit: false
      connection-timeout: 3000
      validation-timeout: 3000
      max-lifetime: 60000
      maximum-pool-size: 20
      minimum-idle: 1

pebble:
  suffix:
  cache: false

server:
  port: ${APP_PORT:8080}

---

spring:
  config:
    activate:
      on-profile: test

server:
  port: 8000

---

spring:
  config:
    activate:
      on-profile: production

server:
  port: 80

pebble:
  cache: true
分隔符---,最前面的配置是默认配置,不需要指定Profile,后面的每段配置都必须以spring.config.activate.on-profile: xxx开头,表示针对指定Profile覆盖。
分别对应直接运行(default),$ java -Dspring.profiles.active=test -jar springboot-profiles-1.0-SNAPSHOT.jar ,$ java -Dspring.profiles.active=production -jar springboot-profiles-1.0-SNAPSHOT.jar
通过Profile可以实现一套代码在不同环境启用不同的配置和功能:
定义存储接口 StorageService:
public interface StorageService {

    // 根据URI打开InputStream:
    InputStream openInputStream(String uri) throws IOException;

    // 根据扩展名+InputStream保存并返回URI:
    String store(String extName, InputStream input) throws IOException;
}
本地存储可通过 LocalStorageService 实现:
@Component
@Profile("default")
public class LocalStorageService implements StorageService { ...... }
而云端存储可通过 CloudStorageService 实现:
@Component
@Profile("!default")
public class CloudStorageService implements StorageService { ...... }
使用:
@Autowired
StorageService storageService;
Conditional
Spring提供了条件装配 @Conditional,编写比较复杂的 Condition 来做判断。Spring Boot则为我们准备好了几个非常有用的条件:
- @ConditionalOnProperty:如果有指定的配置,条件生效;
- @ConditionalOnBean:如果有指定的Bean,条件生效;
- @ConditionalOnMissingBean:如果没有指定的Bean,条件生效;
- @ConditionalOnMissingClass:如果没有指定的Class,条件生效;
- @ConditionalOnWebApplication:在Web环境中条件生效;
- @ConditionalOnExpression:根据表达式判断条件是否生效。
@ConditionalOnProperty
把上一面的 StorageService 改写:
定义配置 storage.type=xxx,用来判断条件,默认为 local:
storage:
  type: ${STORAGE_TYPE:local}
设定为 local 时,启用 LocalStorageService:
@Component
@ConditionalOnProperty(value = "storage.type", havingValue = "local", matchIfMissing = true)
public class LocalStorageService implements StorageService {
    ...
}
设定为 aws 时,启用 AwsStorageService:
@Component
@ConditionalOnProperty(value = "storage.type", havingValue = "aws")
public class AwsStorageService implements StorageService {
    ...
}
设定为 aliyun 时,启用 AliyunStorageService:
@Component
@ConditionalOnProperty(value = "storage.type", havingValue = "aliyun")
public class AliyunStorageService implements StorageService {
    ...
}
注意到 LocalStorageService 的注解 matchIfMissing = true:当指定配置为 local或者配置不存在,均启用 LocalStorageService。
加载配置文件
Spring中通过注解 @Value 加载配置文件;如定义一个最大允许上传的文件大小配置:
storage:
  local:
    max-size: 102400
@Component
public class FileUploader {
    @Value("${storage.local.max-size:102400}")
    int maxSize;

    ...
}
为了更好地管理配置,Spring Boot允许创建一个Bean,持有一组配置,并支持自动注入:
storage:
  local:
    # 文件存储根目录:
    root-dir: ${STORAGE_LOCAL_ROOT:/var/storage}
    # 最大文件大小,默认100K:
    max-size: ${STORAGE_LOCAL_MAX_SIZE:102400}
    # 是否允许空文件:
    allow-empty: false
    # 允许的文件类型:
    allow-types: jpg, png, gif
定义一个Java Bean,持有该组配置:
@Configuration
@ConfigurationProperties("storage.local")
public class StorageConfiguration {
    private String rootDir;
    private int maxSize;
    private boolean allowEmpty;
    private List<String> allowTypes;

    // TODO: getters and setters
}
@ConfigurationProperties("storage.local"):从配置项 storage.local 读取该项的所有子项配置;
@Configuration:StorageConfiguration 也是一个Spring管理的Bean,可直接注入到其他Bean中;
使用
@Component
public class StorageService {
    final Logger logger = LoggerFactory.getLogger(getClass());

    @Autowired
    StorageConfiguration storageConfig;

    @PostConstruct
    public void init() {
        logger.info("Load configuration: root-dir = {}", storageConfig.getRootDir());
        logger.info("Load configuration: max-size = {}", storageConfig.getMaxSize());
        logger.info("Load configuration: allowed-types = {}", storageConfig.getAllowTypes());
    }
}
禁用自动配置
Spring Boot使用自动配置和默认配置,极大地减少了代码,通常只需要加上几个注解,并按照默认规则设定一下必要的配置即可。
例如,配置JDBC,只需要配置一个 spring.datasource:
spring:
  datasource:
    url: jdbc:hsqldb:file:testdb
    username: sa
    password:
    dirver-class-name: org.hsqldb.jdbc.JDBCDriver
将自动创建出 DataSource、JdbcTemplate、DataSourceTransactionManager
禁用自动配置
如果系统有主从两个数据库,而Spring Boot的自动配置只能配一个;需要禁用自动配置改手动配置:
@SpringBootApplication
// 启动自动配置,但排除指定的自动配置:
@EnableAutoConfiguration(exclude = DataSourceAutoConfiguration.class)
public class Application {
    ...
}
编写主从数据库配置
spring:
  datasource-master:
    url: jdbc:hsqldb:file:testdb
    username: sa
    password:
    dirver-class-name: org.hsqldb.jdbc.JDBCDriver
  datasource-slave:
    url: jdbc:hsqldb:file:testdb
    username: sa
    password:
    dirver-class-name: org.hsqldb.jdbc.JDBCDriver
创建主从DataSource
public class MasterDataSourceConfiguration {
    @Bean("masterDataSourceProperties")
    @ConfigurationProperties("spring.datasource-master")
    DataSourceProperties dataSourceProperties() {
        return new DataSourceProperties();
    }

    @Bean("masterDataSource")
    DataSource dataSource(@Autowired @Qualifier("masterDataSourceProperties") DataSourceProperties props) {
        return props.initializeDataSourceBuilder().build();
    }
}
public class SlaveDataSourceConfiguration {
    @Bean("slaveDataSourceProperties")
    @ConfigurationProperties("spring.datasource-slave")
    DataSourceProperties dataSourceProperties() {
        return new DataSourceProperties();
    }

    @Bean("slaveDataSource")
    DataSource dataSource(@Autowired @Qualifier("slaveDataSourceProperties") DataSourceProperties props) {
        return props.initializeDataSourceBuilder().build();
    }

}
@Import 导入
@SpringBootApplication
@EnableAutoConfiguration(exclude = DataSourceAutoConfiguration.class)
@Import({ MasterDataSourceConfiguration.class, SlaveDataSourceConfiguration.class})
public class Application {
    ...
}
@AbstractRoutingDataSource
@Primary 标注DataSource,它采用Spring提供的 AbstractRoutingDataSource,代码实现如下:
class RoutingDataSource extends AbstractRoutingDataSource {
    @Override
    protected Object determineCurrentLookupKey() {
        // 从ThreadLocal中取出key:
        return RoutingDataSourceContext.getDataSourceRoutingKey();
    }
}
RoutingDataSource 本身并不是真正的 DataSource,它通过Map关联一组 DataSource
下面的代码创建了包含两个 DataSource 的 RoutingDataSource,关联的key分别为masterDataSource 和 slaveDataSource:
public class RoutingDataSourceConfiguration {
    @Primary
    @Bean
    DataSource dataSource(
            @Autowired @Qualifier("masterDataSource") DataSource masterDataSource,
            @Autowired @Qualifier("slaveDataSource") DataSource slaveDataSource) {
        var ds = new RoutingDataSource();
        // 关联两个DataSource:
        ds.setTargetDataSources(Map.of(
                "masterDataSource", masterDataSource,
                "slaveDataSource", slaveDataSource));
        // 默认使用masterDataSource:
        ds.setDefaultTargetDataSource(masterDataSource);
        return ds;
    }

    @Bean
    JdbcTemplate jdbcTemplate(@Autowired DataSource dataSource) {
        return new JdbcTemplate(dataSource);
    }

    @Bean
    DataSourceTransactionManager dataSourceTransactionManager(@Autowired DataSource dataSource) {
        return new DataSourceTransactionManager(dataSource);
    }
}
通过注解配合AOP实现自动切换:
@Controller
public class UserController {
    @RoutingWithSlave // <-- 指示在此方法中使用slave数据库
    @GetMapping("/profile")
    public ModelAndView profile(HttpSession session) {
        ...
    }
}
实现上述功能需要编写一个@RoutingWithSlave注解,一个AOP织入和一个ThreadLocal来保存key:
@Aspect
@Component
public class RoutingAspect {
    @Around("@annotation(routingWithSlave)")
    public Object routingWithDataSource(ProceedingJoinPoint joinPoint, RoutingWithSlave routingWithSlave)
            throws Throwable {
        try (RoutingDataSourceContext ctx = new RoutingDataSourceContext(RoutingDataSourceContext.SLAVE_DATASOURCE)) {
            return joinPoint.proceed();
        }
    }
}
Filter
Spring Boot中,可以做到零配置添加 Filter :
Spring Boot会自动扫描所有的FilterRegistrationBean类型的Bean,然后,将它们返回的Filter自动注册到Servlet容器中,无需任何配置。
如实现 AuthFilter,首先编写一个AuthFilterRegistrationBean,它继承自FilterRegistrationBean:
@Component
public class AuthFilterRegistrationBean extends FilterRegistrationBean<Filter> {
    @Autowired
    UserService userService;

    @Override
    public Filter getFilter() {
        setOrder(10);
        return new AuthFilter();
    }

    class AuthFilter implements Filter {
        ...
    }
}
FilterRegistrationBean 本身不是 Filter,实际上是 Filter 的工厂。Spring Boot会调用 getFilter(),把返回的 Filter 注册到Servlet容器中。
匹配URL
@Component
public class ApiFilterRegistrationBean extends FilterRegistrationBean<Filter> {
    @PostConstruct
    public void init() {
        setOrder(20);
        setFilter(new ApiFilter());
        setUrlPatterns(List.of("/api/*"));
    }

    class ApiFilter implements Filter {
        ...
    }
}
在 @PostConstruct 方法中,通过 setFilter() 设置一个 Filter 实例后,再调用 setUrlPatterns() 传入要过滤的URL列表。